Facemask Camera
Last Updated: February 26, 2025
Inside the Box
- Facemask Camera
- USB / Power Cable
- AC Adapter
- 8 GB Micro-SD Card
- Mini Screwdriver
- Mounting Brackets, Screws and Spacers

Getting Started
- Before first use, charge the camera for about 2-3 hours.
- Charge by plugging in the included USB cable into the USB mini-port on the bottom of the camera and the other end to either the AC Adapter or the USB port on a computer.
- The LED will glow RED while the battery is charging.
- Once the battery is fully charged, the LED will change to a solid GREEN.
- Insert the micro-SD card into the SD slot on top of the camera. Note that the camera is compatible with micro-SD cards up to 32 GB capacity.
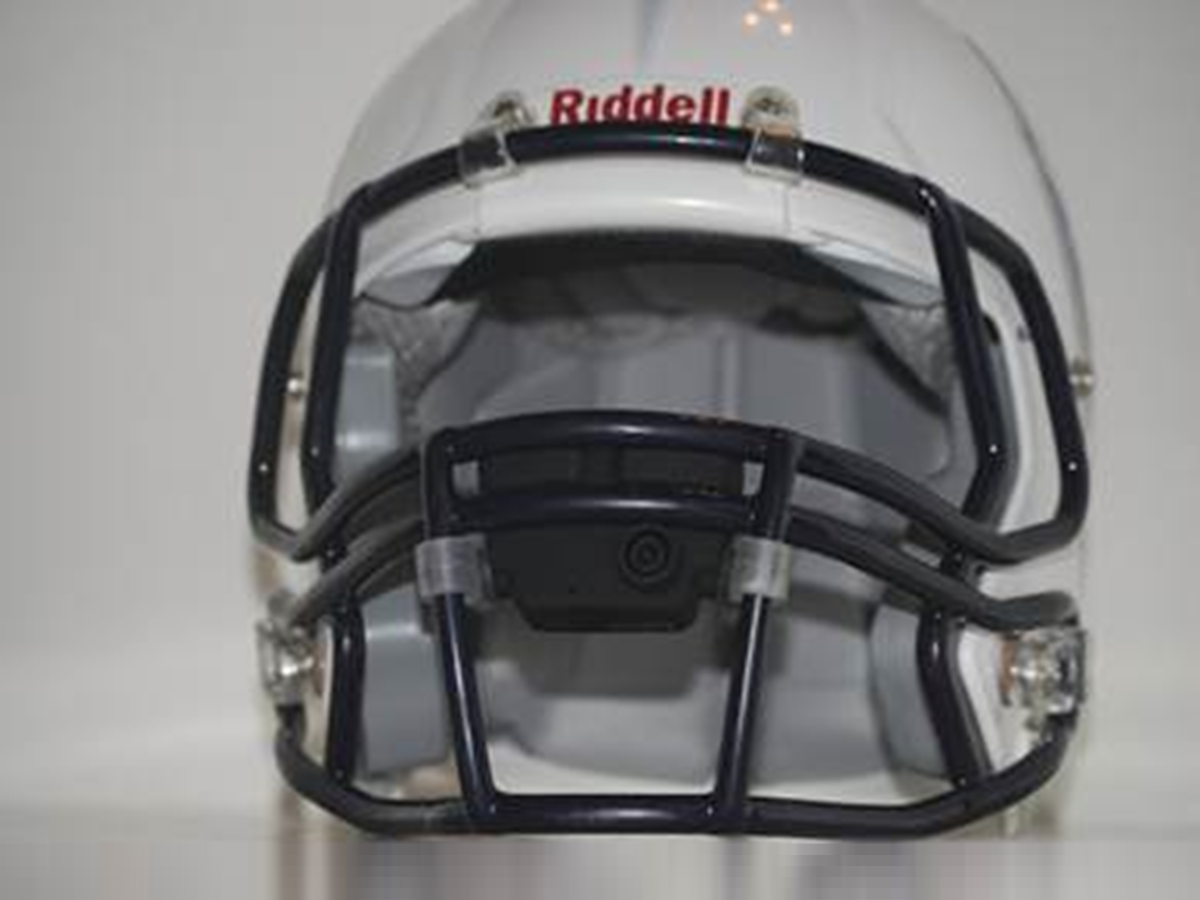
- Securely mount the camera to the helmet facemask.
- Press the Power/Record button on the BOTTOM of the camera in order to turn on the camera and begin recording.
- The camera automatically records video whenever it is turned on and not connected to the USB or AC adapter.
- To stop recording, press the power button again to turn off the camera.
- Remove the micro-SD card from the camera and insert the card into your computer to access the video.
Attaching to Helmet

Your Facemask Camera is designed to attach securely to both Riddell Speed and Riddell 360 helmets.
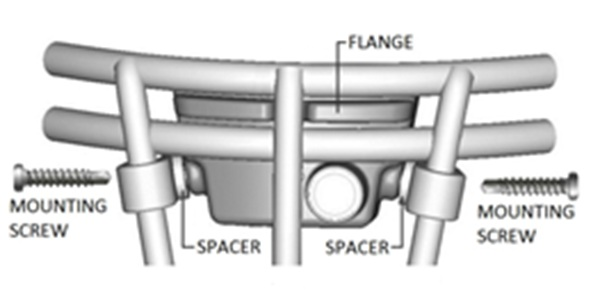
- From inside the facemask, place the camera against the facemask so that the flange on the front of the camera is inside the horizontal space as shown below.
- Attach the mounting brackets to the vertical facemask bars and secure with the screws that are included in your camera kit. Important! Make sure the screws are snug, but do not over-tighten.
- Depending on the style of facemask you are attaching the camera to, you may need to add additional spacers between the camera and the mounting brackets as shown below. We have included various widths of spacers and additional screws in order to accommodate minor differences between various facemask styles.
Recording Video
To turn on your camera, press the Power button on the BOTTOM of the camera. The LED light on the BACK of the camera will glow a solid GREEN to confirm that the camera is recording.
Please note that the camera automatically records video whenever it is turned on and not connected to the USB or AC adapter.
To stop recording, once again press the Power button and the LED light, as well as the camera, will turn off.
In Record Mode, the battery has a few hours of recording time. Actual recording time will depend on the capacity of the micro-SD card, the charge of the battery and how many times you are starting and stopping the camera.
Recording Tips
If the LED light is a solid BLUE instead of GREEN, this notifies you that there is no micro-SD card in the camera and thus the camera is unable to record video.
We have included an 8GB micro-SD card so that you can start recording video immediately. The 8GB micro-SD card will store approximately 4 hours of video.
If your micro-SD card is full, the camera will not be able to power on and begin recording video. You must remove some video from the micro-SD card before you are able to record additional video.
Viewing Video
There are two ways to view your recorded video:
- Remove the micro-SD card from the camera and place the card into the SD slot on your computer.
- Place the USB cable into the USB port on the BOTTOM of the camera and plug the other end into the USB slot on your computer.
Important! Remember to properly shutdown the micro-SD or USB drive on your computer before removing the micro-SD card or USB cable from your device.
Changing Video Time Code
To change the timestamp shown on the video:
- Insert the micro-SD card into the computer or connect the camera to the computer via USB.
- Open the removable disk drive that the camera represents.
- Create a text document called TIME on the root of the camera’s removable disk drive.
- Input the true local time using the following format:
- June 1, 2025 2:30:00pm is 2025 06 01 14 30 00
Note that a space is needed between each set of numbers
Camera Care and Maintenance
While the Facemask Camera is designed to handle physical contact and forceful impacts, it is still a technology device and requires some general care and maintenance.
The following tips will help keep your camera in good condition allowing you to record excellent video for many years to come.
- Most Important Tip: Please remember that your Facemask Camera is water resistant, NOT waterproof! The inside of your camera includes many electronic circuits that can be damaged if water gets on them. We have designed this camera to resist common weather elements and small water spills. However, avoid pouring liquid such as water or Gatorade directly on the camera.
- Make sure that the USB and micro-SD camera covers are properly sealing the camera slots to avoid water leaking into the camera’s internal components.
- Clean camera lens with a safe lens cleaner and soft cloth.
- Always store the camera in its product case when it is not being used on a facemask. Keep the camera in a separate pouch from the power cords, adapter, etc. so as to not scratch the camera lens.
- Do not over-tighten the camera on the facemask to avoid stripping the camera threads.
- Do not overcharge the camera by keeping it plugged into the outlet overnight.
Product Specifications
| Specification | Details |
|---|---|
| Product Size and Weight | 2.7 x 1.3 x 1.7 inches / 1.93 ounces |
| Power Supply | Embedded 650mAh Li-polymer Battery |
| Power Duration | 2.0 to 2.5 Hours / Consumes < 1W |
| Working Temperature | 15° to 145° Fahrenheit |
| Storage Temperature | 0° to 150° Fahrenheit |
| Memory Supported | Max: High Speed 32 GB TF Card |
| USB | 2.0 High Speed |
| Video Resolution | 1280 x 720 |
| Video Pixels | 3 Mega Pixel |
| Recording Speed | 30 frames per second |
| Video File Format | H.264 / .MOV format |
| Video Lens Angle | 135 degrees |
Troubleshooting
| Symptom | Possible Reason | Solution |
|---|---|---|
| Failed to Start | Low Power | Recharge Battery |
| Auto Shut-Off | Low Power / Micro-SD Card Full | Recharge Battery / Remove videos from card |
| LED Constant BLUE | Unable to read card | Properly insert micro-SD card |
Website: watchgamefilm.com/cameras/facemask
Email: help@watchgamefilm.com